Before sending USDT from CoinDCX to Binance, make sure your Binance account is verified. Always use the BEP-20 network to avoid fees and get faster transfers. Check that you have enough USDT to cover the 0.6 USDT withdrawal fee. When copying Binance’s deposit address, be very careful, sending to the wrong network will result in permanent loss.
Moving USDT from CoinDCX to Binance is easy and safe if you do it the right way. This guide will show you how, step by step. First, check your CoinDCX balance. Then, pick the best network to save on fees. You’ll also learn how to send your USDT cheaply and securely to Binance.
Even if you’re new to crypto or just want to save money on transfers, this guide will help. Let’s start with the basics you need to know before sending your USDT.
Things to Check Before Transfer
First, make sure your Binance account is verified. Without verification, you cannot deposit money. Binance needs this step to follow rules, so do it first.
Next, remember that CoinDCX has a minimum transfer limit of ₹100. You can withdraw all your money if needed, but always check the withdrawal fees first. These fees reduce your total amount, so calculate how much you will get.
Before sending money, check your USDT balance in CoinDCX. You must have enough for both the transfer and the fee. If your balance is too low after the fee, the transfer will fail.
Need More USDT? Buy It Easily:
If you don’t have enough USDT because of fees, buy more on CoinDCX:
- Open the CoinDCX app and go to the search bar.
- Type “USDT” and select it.
- Click Buy and enter the amount you need.
- Pay with your preferred method.
After buying enough USDT, you can transfer safely. Always check details before confirming to avoid mistakes.
Best Blockchain Network for Transfer
When you send cryptocurrency, you must choose a blockchain network to complete the transfer. Different networks have different fees, speeds, and security levels. Picking the right one helps you save money and ensures your transfer goes smoothly.
Since you are using Binance, we suggest Binance Smart Chain (BEP-20). Here’s why:
- It is Binance’s own network, so transfers are fast and safe.
- The withdrawal fee is 0 USDT when sending within Binance, so it costs nothing.
Fee Comparison for Different Networks
| Network | Withdrawal Fee (USDT) |
|---|---|
| Tron (TRC20) | 1 USDT |
| BNB Smart Chain (BEP20) | 0 USDT |
| Ethereum (ERC20) | 2 USDT |
| Polygon POS | 0.1 USDT |
| The Open Network (TON) | 0.3 USDT |
Which Network Should You Use?
- For Binance transfers, always pick BEP-20, it’s free and fast.
- If the receiving wallet/exchange does not support BEP-20, use TRC20 (Tron) or Polygon, they have low fees.
- Ethereum (ERC20) works almost everywhere but has high fees, so only use it if you have to.
Always check the network twice before sending money. Choosing the right one makes your transfer quick, safe, and cheap.
How to Transfer USDT from Coindcx to Binance: Process
Transferring USDT from CoinDCX to Binance is easy, but small errors can cause delays or failed transfers. Follow these steps carefully to avoid problems.
Step 1: Open CoinDCX and Go to Withdrawal Section
- Open the CoinDCX app and log in to your account.
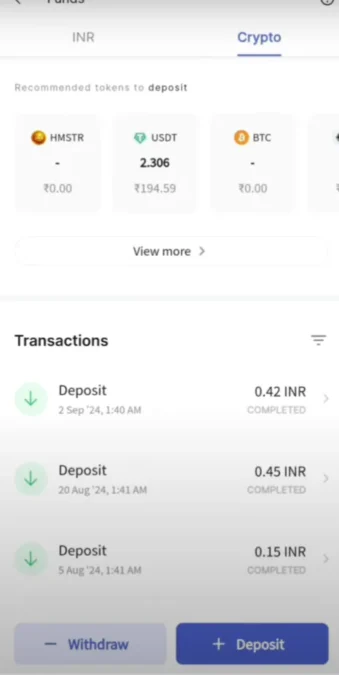
- Go to the “Funds” section (usually at the bottom of the screen).
- Inside Funds, tap on the “Crypto” tab.
- Click on the “Withdraw” button to start the process.
Step 2: Select USDT and Choose the Correct Network
- From the list of cryptocurrencies, pick Tether (USDT) as your withdrawal asset.
- When asked if you control the receiving wallet, select “Yes” (since Binance is your wallet).
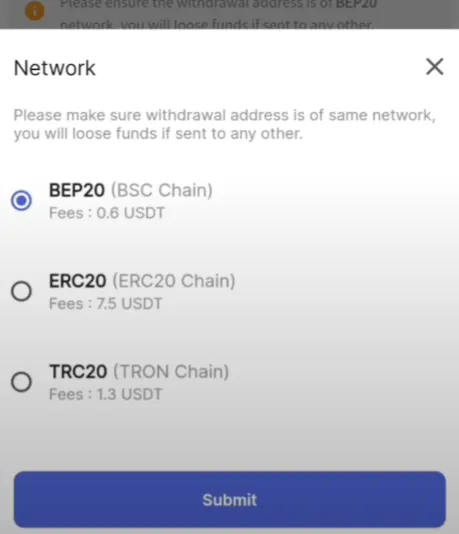
- Important: Choose BEP-20 (Binance Smart Chain) as the network. Using the wrong network can make your funds disappear.
Step 3: Copy Your Binance USDT Deposit Address
- Open your Binance app and go to the “Deposit” section.
- Search for Tether (USDT) and select it.
- Pick the BEP-20 (BSC) network—this will show your Binance USDT deposit address.
- Copy this address carefully—even a small mistake can send funds to the wrong place.

Step 4: Paste the Address in CoinDCX and Enter Amount
- Go back to CoinDCX and paste the Binance deposit address in the required box.
- Enter the amount of USDT you want to send.
- Remember: CoinDCX charges a 0.6 USDT withdrawal fee, so make sure your balance covers both the transfer and the fee.
Step 5: Confirm and Complete the Withdrawal
- Enter your CoinDCX withdrawal password for security.
- Double-check amount, address, and network—one mistake can cause big problems.
- Swipe to confirm the withdrawal.
- You’ll get an OTP on your email—enter this to finalize the transfer.
Once confirmed, your USDT should reach Binance in a few minutes. If it takes too long, check the transaction status in CoinDCX or contact support.
By following these steps correctly, your transfer will be smooth and safe.
Transfer Fees: CoinDCX to Binance
When you transfer USDT from CoinDCX to Binance, there are two kinds of fees you must know:
- CoinDCX Withdrawal Fee – CoinDCX takes a fixed fee of 0.6 USDT for every USDT withdrawal. For example, if you send 100 USDT, Binance will only receive 99.4 USDT.
- Network Fee – Some blockchains charge an extra fee for the transfer. This depends on which network you pick.
Fee Breakdown by Network
| Network | Network Fee (USDT) | CoinDCX Fee (USDT) | Total Deducted (USDT) |
|---|---|---|---|
| BEP-20 | 0 | 0.6 | 0.6 |
| TRC-20 | 1 | 7.5 | 1.6 |
| ERC-20 | 2 | 1.3 | 2.6 |
Key points:
- BEP-20 has no network fee (only CoinDCX’s 0.6 USDT charge)
- TRC-20 adds 1 USDT network fee
- ERC-20 adds 2 USDT network fee
- All networks include CoinDCX’s standard 0.6 USDT processing fee
Best Choice for Lowest Fees
If you want the lowest fees, always choose BEP-20. It only charges CoinDCX’s 0.6 USDT fee. TRC-20 and ERC-20 cost more because of extra network fees.
Before you confirm the transfer, check the total fees so you know exactly how much will reach Binance.
Security Tips to Avoid Mistakes
When transferring cryptocurrency, even a small error can make you lose your money. To make sure your transfer is safe and works correctly, follow these important rules:
1. Always Use the Same Network
- The network you pick on CoinDCX must be the same as the one on Binance. For example, if you choose BEP-20 (Binance Smart Chain) on CoinDCX, Binance must also accept BEP-20.
- If you pick the wrong network (like sending TRC20 to an ERC20 address), you may lose your money forever.
2. Double-Check the Wallet Address
- Never type the wallet address yourself, always copy and paste it to avoid mistakes.
- Before sending, check the first and last few letters of the address to make sure it is correct.
3. Confirm All Details Before Sending
- Look at the amount, network, and wallet address one more time before clicking confirm.
- Some exchanges let you send a small test transaction, if you are sending a lot of money, try sending a little first to check.
By doing these things, you can avoid problems and make sure your money goes to the right place safely. Spending a few extra seconds to check everything can prevent big mistakes.
Conclusion
That’s all! Now you know how to safely move USDT from CoinDCX to Binance. We explained how to pick the correct network, avoid extra fees, and prevent mistakes. If you follow these steps properly, your transfer will go smoothly without problems.
Need help? Don’t worry! Just leave a comment below, and we’ll guide you. Happy trading!
You can read also: How to Transfer USDT from Binance to Trust Wallet in 2025
Also Read:
Important Links
| For More Information, Check Out Our Official Website |
| Join Telegram Channel For Latest Updates on Treasure NFT |
| Join WhatsApp Channel For Latest Updates on Treasure NFT |